Zoom Meetings
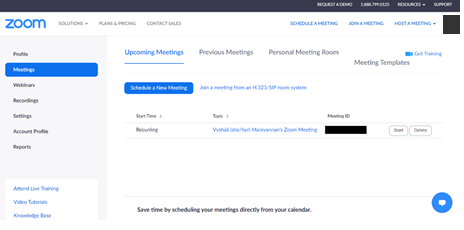
You’ll automatically download the Zoom desktop client when you start your first Zoom meeting, or you can manually download it here. When you click a Zoom meeting link in your browser, it will automatically launch the meeting in your desktop client. If it doesn’t, you can click “Launch in Zoom.” To log in to Zoom and manage your profile and preferences, go to https://pace.zoom.us. When you click “Login” in the top right corner, you’ll be prompted to sign in with your university credentials. This will take you to the “Meetings” landing page:
To personalize your Zoom account, click “Profile” in the left-hand column and do the following:
- Avatar. Choose a profile photo that shows your face! This is what will appear to the class if your camera is off.
- Pronouns/Name. Click “Edit” to the right of your name. In the field listing your first name, add your pronouns in parentheses. If you go by a name other than the name on file with the registrar, click “Edit” to the right of your name and change it when prompted.
When you sign in using the desktop client, click “Sign in with SSO,” and enter “pace” when asked to input the company domain. If you have difficulty downloading the Zoom desktop client, you can click “Join from browser” when prompted, but be aware that this is a much more limited experience.
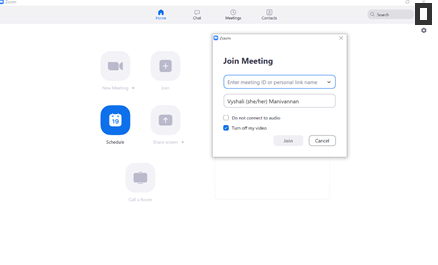
From the desktop client, you can join meetings if you have the meeting ID and password. For instance, after scheduling conferences with me, you’ll be sent Zoom meeting information from Calendly; at our scheduled appointment time, open the desktop client, click the + icon above “Join” and when prompted, enter the meeting ID and password.
When you join one of our class meetings, you may be placed into a Waiting Room. This may be because the host hasn’t started the meeting yet, or because all new arrivals are sorted into the Waiting Room by default.
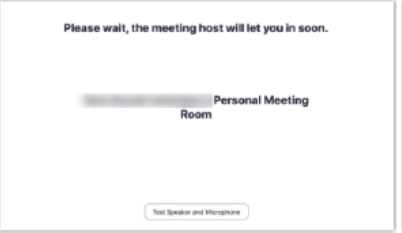
All you need to do is wait to be admitted, which will be when the host begins the meeting or when you are individually let into the session. In the meeting, your meeting controls will appear in the bottom row, including: “Mute/Unmute,” “Start Video,” “Participants,” “Chat,” “Share Screen,” “Reactions,” and “More,” which includes “Closed Caption” (must be entered manually) and “Breakout Rooms.” The controls you’ll primarily use include:
- Audio. Click the microphone icon to mute or unmute yourself. You can also do this by hitting spacebar or alt-A. You can change your microphone input or audio output (e.g., switch from internal to external mic or computer audio to wireless headphones) by clicking the small up arrow [^] next to the microphone icon.
- Video. Click the camera icon to turn video on or off.
- Virtual Backgrounds. Click the small up arrow [^] next to the camera icon to select a virtual background. You can choose a preloaded virtual background, or upload an image from your computer by clicking the plus [+] icon on the right side, then “Add Image.” (Video backgrounds are disabled.) Once you’ve selected your background, simply close the “Settings” window to return to the Zoom meeting with your virtual background in place. I completely understand that sometimes you can’t or don’t want to display your surroundings even if you want to have your camera on, so use a virtual background whenever you like.
- Raise Hand. Click “Participants” to open a panel in the right-hand column indicating who is present in the meeting. There are various menu options at the bottom of that panel. Click on the “Raise Hand” icon to activate it. You can also click on “Go Slower” or “Go Faster” to give me feedback about my speed, or click the “More” icon […] to indicate “Need a Break” or change your status to “Away.”
- Chat. Click “Chat” to open a panel in the right-hand column where you can type questions or responses (visible to everyone) or privately message your instructor. (You can change who you are communicating with by clicking “Everyone” and selecting a different option.)
- Share Screen. Screen sharing is unavailable by default during full class sessions. You may request permission to share your screen during individual or group meetings. You may also find it useful to share your screen in synchronous peer sessions or other meetings. To do so, click “Share Screen”; a window will pop up with all possible displays to share. Click on the item you want to display, which will then be highlighted, and then confirm by clicking “Share.” You will be sharing your screen as long as you remain on the display you elected to share. You can pause screen sharing by clicking “Pause Share.” If permitted, you can click the “Annotate” button to write on the screen. To end screen sharing, click the red “Stop Share” button.
- Reactions. You can applaud or agree with what I’m saying by clicking the “Clap” or “Thumbs Up” emoji.
- Breakout Rooms. If you want to further divide your peer groups in a synchronous peer session, the host of your meeting can click “More” […] and then “Breakout Rooms.” You can automatically assign people to groups or manually assign people to rooms.
- End.To leave the meeting, click the red “End” button in the lower right-hand corner.
As for community guidelines and etiquette, try to find a quiet location from which to join your session, mute yourself when you aren’t talking, and use the “Raise Hand” icon or, if your camera is on, visibly raise your hand so we can avoid the chaos of background noise or everyone talking at once. Make sure you have access to a strong WiFi signal or use a wired Ethernet connection to ensure a steady signal without disruption. Join a few minutes early to test for audio, video, or WiFi issues. If you’re having technical difficulties, notify your instructor via another platform. You may want to use a headset, earbuds, or (if you have one already for gaming or podcasting) an omnidirectional microphone to reduce background noise or echo. You may eat during class, dress casually, and attend from bed with a virtual background or your camera off. All that matters to me is that you participate regularly and consistently. Be kind and respectful to one another and to me, and come to class as hyped as you can for writing and working with one another!